Tuesday, November 11, 2014

Live RTSP streaming using the Video Processing Project

In this post, we take a look at how we can stream live video and audio from a web cam using the video processing project.

We will use the following VPP filters:

  • CSIR VPP Scale Filter
  • CSIR VPP H264 Encoder
  • CSIR VPP RTSP Sink Filter
  • CSIR VPP RTSP Source Filter
Additionally you will need either an AMR or AAC encoders/decoders. Igor Janos from Monogram made some available on his blog a couple of years ago.

You will also need GraphEdit, GraphStudio or GraphStudioNext (recommended) to construct the graphs.

The VPP RTSP filters use the Live555 Streaming Media libraries which implement the RTSP/RTP/RTCP stacks. 

To stream audio and video from a webcam or live capture source setup a graph as shown in Figure 1.
Figure 1: RTSP Sink Graph
It is important to limit the source resolution (either via IAMStreamConfig or via the VPP Scale Filter ) and framerate (either via IAMStreamConfig or via the VPP Frame Skipping Filter) as this affects both the bitrate and the time required to encode the image. The current VPP Encoder can comfortably encode CIF video at 15 frames a second when in Mode 1. Mode 1 means that the encoder limits the bits per frame to the specified Frame Bit Limit parameter. In this example we have selected 5000 bits per frame. At e.g. 10 frames a second, this equals 50kb/s. Note that the filters must be configured before the graph is played.

Once the graph is played, start another instance of GraphStudioNext.
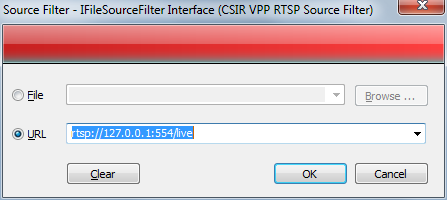
Figure 2: RTSP Source Graph
Insert the CSIR VPP RTSP Source Filter into the graph which will bring up a dialog (see Figure 2) allowing you to input the RTSP URI which will be of the format rtsp://<<ip>[:<<rtsp_port>>]/live. The VPP RTSP Sink Filter creates a session named "live". Finally render the output pins of the RTSP Source Filter which results in a graph similar to the one in Figure 3. The decoders will vary depending on what is installed on the machine.

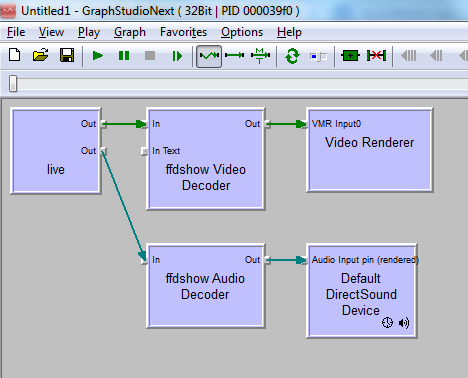
Figure 3: Rendered RTSP Source Graph 
 Or alternatively use VLC. "Ctrl + N" brings up a dialog allowing you to enter the RTSP URI as shown in Figure 4.
Figure 4: RTSP with VLC
The Caching parameter should be set sufficiently big (at least 500ms, or even better 1000ms).
When this parameter is too small, VLC struggles to synchronise the audio and video resulting in many frames being discarded. This can be seen on the logging window if the verbosity is high enough.


Monday, January 7, 2013

FFMPEG/VLC command lines (Linux)

Write live video to mp4 file:

ffmpeg -f video4linux2 -s 320x240 -i /dev/video0 test.mp4

With sound:
ffmpeg -f video4linux2 -s 320x240 -i /dev/video0 -f alsa -i hw:0 -f mp4 test3.mp4

Write to a raw .264 file
ffmpeg -f video4linux2 -s 320x240 -i /dev/video0 -vcodec libx264 -f h264 test.264

With access unit delimiters
ffmpeg -f video4linux2 -s cif -i /dev/video0 -x264opts slice-max-size=1400:vbv-maxrate=512:vbv-bufsize=200:fps=15:aud=1 -f mp4 -vcodec libx264 -f h264 rtp_aud_.264

Convert raw .264 to mp4
ffmpeg -i test.264 test_convert.mp4

Pipe into another process
ffmpeg -f video4linux2 -s cif -i /dev/video0 -x264opts slice-max-size=1400:vbv-maxrate=512:vbv-bufsize=200:fps=15 -f mp4 -vcodec libx264 -f h264 pipe:1 | ./pipe_test 

Send over RTP and generate SDP on std out:
ffmpeg -f video4linux2 -s cif -i /dev/video0 -x264opts slice-max-size=1400:vbv-maxrate=512:vbv-bufsize=200:fps=15 -f mp4 -vcodec libx264 -f rtp rtp://127.0.0.1:49170

Generates:

v=0
o=- 0 0 IN IP4 127.0.0.1
s=No Name
c=IN IP4 127.0.0.1
t=0 0
a=tool:libavformat 54.17.100
m=video 49170 RTP/AVP 96
a=rtpmap:96 H264/90000
a=fmtp:96 packetization-mode=1

Low Delay RTP:
ffmpeg -f video4linux2 -s cif -i /dev/video0 -x264opts slice-max-size=1400:vbv-maxrate=100:vbv-bufsize=200:fps=25 -f mp4 -vcodec libx264 -tune zerolatency -f rtp rtp:127.0.0.1:49170

Can be played with (where test.sdp should include the generated SDP): 
./vlc -vvv test.sdp


Using VLC to stream over RTP AND display live stream:
./vlc -vvv v4l2:///dev/video0 :v4l2-standard= :v4l2-dev=/dev/video0 --v4l2-width=352 --v4l2-height=288 --sout-x264-tune zerolatency --sout-x264-bframes 0 --sout-x264-aud --sout-x264-vbv-maxrate=1000 --sout-x264-vbv-bufsize=512 --sout-x264-slice-max-size=1460 --sout '#duplicate{dst="transcode{vcodec=h264,vb=384,scale=0.75}:rtp{dst=130.149.228.93,port=49170}",dst=display}'

However this does not seem to generate the SPSs and PPSs.

Edit:
 --sout-x264-options=repeat-headers is necessary to repeat SPS and PPS in stream.

Low delay capture with VLC:
./vlc --live-caching 0 --sout-rtp-caching 0 -vvv v4l2:///dev/video1 :v4l2-standard= :v4l2-dev=/dev/video0 --v4l2-width=352 --v4l2-height=288 --sout-x264-tune zerolatency --sout-x264-bframes 0 --sout-x264-options repeat-headers=1 --sout-x264-aud --sout-x264-vbv-maxrate=1000 --sout-x264-vbv-bufsize=512 --sout-x264-slice-max-size=1460 --sout '#duplicate{dst="transcode{vcodec=h264,vb=384,scale=0.75}:rtp{dst=130.149.228.93,port=49170}",dst=display}'

Tuesday, November 20, 2012

RTCP Timeout Interval (RFC3550 vs RFC4585)

The main advantages of using the Early Feedback Profile for RTCP-based feedback or AVPF are

  • reduced minimum interval: the 5 second minimum interval has been removed. The randomisation factor causes the interval to fall somewhere in the [2.5/1.21828, 7.5/1.21828] second interval unless the reduced minimum value is used.
  • Immediate/early feedback mode: important events can be communicated back to the sender provided that certain conditions are met.
Figure 1 illustrates the differences in the timeout intervals for unicast scenarios, where the top and bottom dotted lines represent the minimum and maximum intervals possible, the dashed line in the middle is the deterministic value of the timeout, and the solid line includes the effect of randomisation.
An average RTCP packet size of 96 bytes was used in the calculations. The initial timeout value was not considered.

Figure 1: RTCP Timeout Intervals


This shows that the mean RTCP interval for bitrates of around 100kbps and above is less than 200ms, which is a big step away from 5s.


Sunday, June 24, 2012

Using the FrameSkippingFilter to drop the framerate

Sometimes it is desirable to reduce the framerate of a video. In the FrameSkippingFilter the user can select the value n, where a frame will be dropped every n frames. This makes it simple to halve the framerate.
This filter could easily be extended to perform more complex dropping schemes, but does not currently support that.


An example media pipeline shows the results:


A FramerateDisplayFilter has been inserted before the FrameSkippingFilter, and one after, to illustrate the effect.


As can be seen in the screen capture, the framerate has been halved.


Using the FramerateDisplayFilter

The FramerateDisplayFilter is a filter that is useful for check what framerate you are achieving in a live multimedia pipeline. In a live multimedia pipeline, it could be that an encoder is not compressing the media fast enough. It is sometimes desirable to know what frame rate is achievable using different resolutions, encoder modes, etc. It could also be useful in a system where one performs dynamic bitrate adaption.

The FramerateDisplayFilter uses a moving average over the last 50 samples to calculate the average and renders the estimate on top of the video using GDI+.


The FramerateDisplayFilter inherits CTransInPlaceFilter and currently has the following configuration options:


  • mode: time-stamp or system-time
  • X: x- position of the estimate (This can be off the screen)
  • Y: y- position of the estimate (This can be off the screen)
In time-stamp mode, the timestamps of the actual media samples is used in the average calculation.
In system-time mode, the time as the  sample passes through the filter, is used in the average calculation.

Depending on the pipeline, there may be a minor or larger difference between the two.


As per usual, all settings are programmatically configurable using the COM ISettingsInterface interface.

On a side note, if anyone is interested in contributing to the development of this filter, capabilties to set the font, font-color, etc via the property page are still required.

Building the VPP for 64-bit Windows

One difference between targeting 32 and 64 bit Windows is the VC compiler that is used. Under C:\Program Files (x86)\Microsoft Visual Studio 10.0\VC\bin one can find the directories containing the tools needed to target the various environments. More about that can be read on MSDN.

Other things that differ are the include and linker paths. Since we are launching VS with out custom batch file,  we need to update our environment to target Windows 64. In VsVersion, we need to set TARGET=X86_64.

In 64-bit builds a different configuration is used in Visual Studio:


Additionally, one has to be sure that x64 is set as the target for static libraries built in the project.


If any mismatches are detected between x86 and x64, the compilation will fail with the following error message:

fatal error LNK1112: module machine type 'x64' conflicts with target machine type 'X86'

Another couple of tips if you run into compilation errors is to 
  • make sure that you clean the solution
  • Check that the correct lib and bin directories are being used
  • Doublecheck the obj files that are created during compilation are 64-bit. You can do this by running dumpbin /HEADERS somefile.obj
If all went well, you should be able to load the 64-bit version of the filter in the 64-bit version of GraphStudio. You might have to make some tweaks to the paths depending on the platform you're building on, and on the target platform.

Saturday, June 23, 2012

Getting started with the video processing project

This post focuses on how to get the source and build the projects of the Video Processing Project. We will be using Visual Studio 2010 on Windows 7.

Checking out the source

The first step is to check out the source code from sourceforge to some directory VPP_ROOT on the local harddrive http://videoprocessing.svn.sourceforge.net/svnroot/videoprocessing/trunk/videoprocessing


Launching Visual Studio

Then navigate to the VPP_ROOT\Projects\Win32\Launch directory in explorer.  In this directory there is a batch file named RTVC.bat. This is the file that Visual Studio has to be launched via. The reason for this was primarily to be able to install the VPP on various machines with various versions of Visual Studio, the Windows SDK, and different Windows OSs and to get going quickly by making a few simple changes in the environment using these batch files. On executing the batchfile, the VPP Visual Studio solution will be opened. Note that if you are working on Windows 7/Vista, you need to execute the RTVC.bat file via a console that has been started as administrator if you want to register the DirectShow filters from inside Visual Studio.  If you do not start as administrator, you will see the following errors on building the solution:


Optionally configuring VPP for your environment

Typically no modification of the batch files is necessary. However this depends on the specific environment (VS and Windows SDK installation drives, Windows version, etc.). At the very least, you might have to select the version of Visual Studio.

Selecting the Visual Studio version


In VsVersion.bat once can change the VS version by editing the VS_VERSION variable.
 VS_VERSION=VC10  
Change this to the Visual Studio version you are intending to use. The default is VS2010. 


Using Visual Studio Express

Additionally, the project can be built using the express version of Visual Studio by setting
 VC_EXE=VCExpress.exe  

Windows SDK detection


In User.bat the Windows SDK version is detected. This can be overridden manually by setting DSHOWBASECLASSES and WindowsSDKDir.

Building the VPP


If everything is configured correctly, Visual Studio should be launched and the solution can be built by hitting F7.