Sometimes it is desirable to reduce the framerate of a video. In the FrameSkippingFilter the user can select the value n, where a frame will be dropped every n frames. This makes it simple to halve the framerate.
This filter could easily be extended to perform more complex dropping schemes, but does not currently support that.
An example media pipeline shows the results:
A FramerateDisplayFilter has been inserted before the FrameSkippingFilter, and one after, to illustrate the effect.
As can be seen in the screen capture, the framerate has been halved.
Sunday, June 24, 2012
Using the FramerateDisplayFilter
The FramerateDisplayFilter is a filter that is useful for check what framerate you are achieving in a live multimedia pipeline. In a live multimedia pipeline, it could be that an encoder is not compressing the media fast enough. It is sometimes desirable to know what frame rate is achievable using different resolutions, encoder modes, etc. It could also be useful in a system where one performs dynamic bitrate adaption.
The FramerateDisplayFilter uses a moving average over the last 50 samples to calculate the average and renders the estimate on top of the video using GDI+.
The FramerateDisplayFilter inherits CTransInPlaceFilter and currently has the following configuration options:
The FramerateDisplayFilter uses a moving average over the last 50 samples to calculate the average and renders the estimate on top of the video using GDI+.
The FramerateDisplayFilter inherits CTransInPlaceFilter and currently has the following configuration options:
- mode: time-stamp or system-time
- X: x- position of the estimate (This can be off the screen)
- Y: y- position of the estimate (This can be off the screen)
In time-stamp mode, the timestamps of the actual media samples is used in the average calculation.
In system-time mode, the time as the sample passes through the filter, is used in the average calculation.
Depending on the pipeline, there may be a minor or larger difference between the two.
As per usual, all settings are programmatically configurable using the COM ISettingsInterface interface.
On a side note, if anyone is interested in contributing to the development of this filter, capabilties to set the font, font-color, etc via the property page are still required.
Building the VPP for 64-bit Windows
One difference between targeting 32 and 64 bit Windows is the VC compiler that is used. Under C:\Program Files (x86)\Microsoft Visual Studio 10.0\VC\bin one can find the directories containing the tools needed to target the various environments. More about that can be read on MSDN.
Other things that differ are the include and linker paths. Since we are launching VS with out custom batch file, we need to update our environment to target Windows 64. In VsVersion, we need to set TARGET=X86_64.
In 64-bit builds a different configuration is used in Visual Studio:
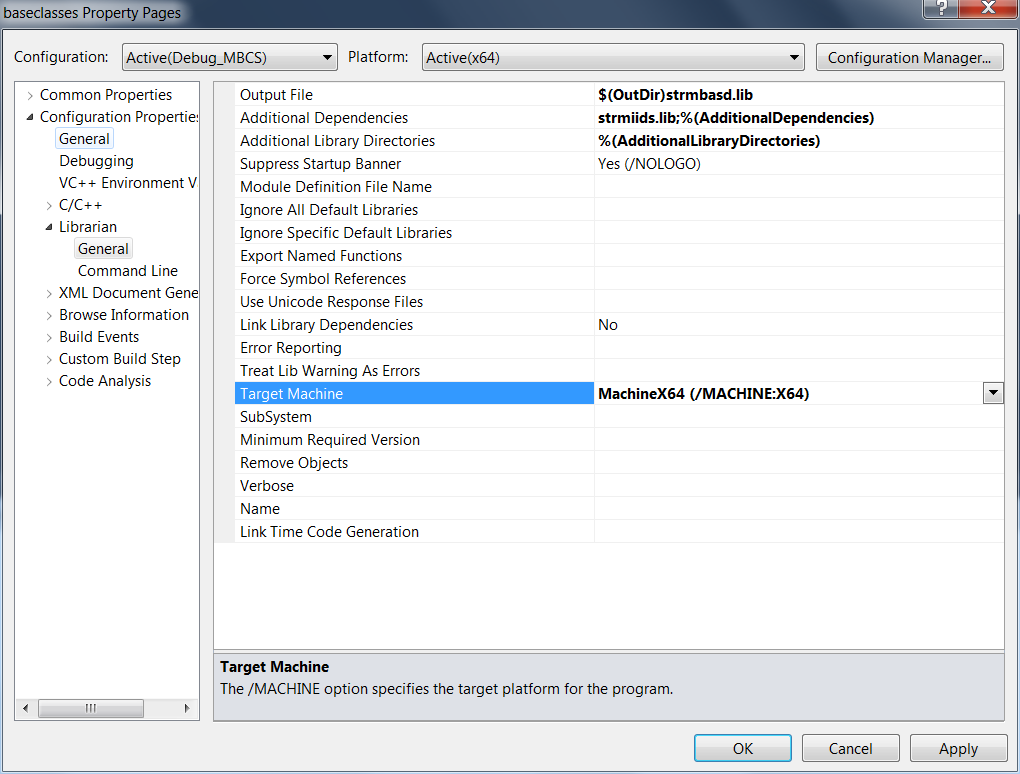
Additionally, one has to be sure that x64 is set as the target for static libraries built in the project.
If any mismatches are detected between x86 and x64, the compilation will fail with the following error message:
fatal error LNK1112: module machine type 'x64' conflicts with target machine type 'X86'
Another couple of tips if you run into compilation errors is to
- make sure that you clean the solution
- Check that the correct lib and bin directories are being used
- Doublecheck the obj files that are created during compilation are 64-bit. You can do this by running dumpbin /HEADERS somefile.obj
If all went well, you should be able to load the 64-bit version of the filter in the 64-bit version of GraphStudio. You might have to make some tweaks to the paths depending on the platform you're building on, and on the target platform.
Saturday, June 23, 2012
Getting started with the video processing project
This post focuses on how to get the source and build the projects of the Video Processing Project. We will be using Visual Studio 2010 on Windows 7.
In VsVersion.bat once can change the VS version by editing the VS_VERSION variable.
In User.bat the Windows SDK version is detected. This can be overridden manually by setting DSHOWBASECLASSES and WindowsSDKDir.
If everything is configured correctly, Visual Studio should be launched and the solution can be built by hitting F7.
Checking out the source
The first step is to check out the source code from sourceforge to some directory VPP_ROOT on the local harddrive http://videoprocessing.svn.sourceforge.net/svnroot/videoprocessing/trunk/videoprocessingLaunching Visual Studio
Then navigate to the VPP_ROOT\Projects\Win32\Launch directory in explorer. In this directory there is a batch file named RTVC.bat. This is the file that Visual Studio has to be launched via. The reason for this was primarily to be able to install the VPP on various machines with various versions of Visual Studio, the Windows SDK, and different Windows OSs and to get going quickly by making a few simple changes in the environment using these batch files. On executing the batchfile, the VPP Visual Studio solution will be opened. Note that if you are working on Windows 7/Vista, you need to execute the RTVC.bat file via a console that has been started as administrator if you want to register the DirectShow filters from inside Visual Studio. If you do not start as administrator, you will see the following errors on building the solution:Optionally configuring VPP for your environment
Typically no modification of the batch files is necessary. However this depends on the specific environment (VS and Windows SDK installation drives, Windows version, etc.). At the very least, you might have to select the version of Visual Studio.Selecting the Visual Studio version
VS_VERSION=VC10
Change this to the Visual Studio version you are intending to use. The default is VS2010. Using Visual Studio Express
Additionally, the project can be built using the express version of Visual Studio by setting VC_EXE=VCExpress.exe
Windows SDK detection
In User.bat the Windows SDK version is detected. This can be overridden manually by setting DSHOWBASECLASSES and WindowsSDKDir.
Building the VPP
If everything is configured correctly, Visual Studio should be launched and the solution can be built by hitting F7.
Tuesday, June 12, 2012
Using the VPP H.264 DirectShow filter
In this post, we take a quick look at how the VPP H.264 filter can be used using GraphEdit. The H.264 filter accepts both the RGB24 as well as the I420 media types making it compatible with the VPP YUV source filter. The filter can be configured via the property page. Currently, the property page contains the options shown in Figure 1. More options will be added in the future.
At the bottom of the property page, one can tick a checkbox in order to use the standard Microsoft H.264 decoder that comes stock with Windows 7. If the box is unchecked, the VPP decoder will be used, which has a custom media type. Figure 2 shows a graph in which the stock MS H.264 decoder is used to decode the video.
Currently, there are two Modes of Operation that can be selected, mode 0 and mode 1. In mode 0, the Quality of the video can be configured. Valid values lie in the range [0 - 51] with 0 having the best quality and 51 the worst. Figure 2 shows a graph in which the first encoder has Quality 0 and the second encoder Quality 35.
Alternatively, the frame bit limit can be set by setting Mode of Operation equal to 1 which effectively limits the bitrate of the media stream. The frame bit limit is, as the name suggests, measured in bits per frame. That means that to achieve a rate of 128 kb/s with a source video of 10 frames a second, one would need to set the frame bit limit to 12,8 * 1024 = 13107 bits per frame. In a live media pipeline, the VPP Framerate estimator filter may be useful to measure the approximate framerate of the video source.
The other option of interest is the I-frame Period which creates periodic IDR-frames i.e. every n-th frame, will be encoded as an IDR frame.
All parameters are programmatically settable by using the COM ISettingsInterface which all all/most of the VPP DirectShow filters inherit, but that is a post for another day...
P.S. The Notify on I-frame and Prepend parameter sets are no longer used and will be removed in the next release of the software.
| Figure 1 |
At the bottom of the property page, one can tick a checkbox in order to use the standard Microsoft H.264 decoder that comes stock with Windows 7. If the box is unchecked, the VPP decoder will be used, which has a custom media type. Figure 2 shows a graph in which the stock MS H.264 decoder is used to decode the video.
| Figure 2 |
| Figure 2 |
Alternatively, the frame bit limit can be set by setting Mode of Operation equal to 1 which effectively limits the bitrate of the media stream. The frame bit limit is, as the name suggests, measured in bits per frame. That means that to achieve a rate of 128 kb/s with a source video of 10 frames a second, one would need to set the frame bit limit to 12,8 * 1024 = 13107 bits per frame. In a live media pipeline, the VPP Framerate estimator filter may be useful to measure the approximate framerate of the video source.
The other option of interest is the I-frame Period which creates periodic IDR-frames i.e. every n-th frame, will be encoded as an IDR frame.
All parameters are programmatically settable by using the COM ISettingsInterface which all all/most of the VPP DirectShow filters inherit, but that is a post for another day...
P.S. The Notify on I-frame and Prepend parameter sets are no longer used and will be removed in the next release of the software.
Tuesday, May 22, 2012
Cleaning up after VS projects builds
Visual Studio seems to create large amounts of temporary files which over time occupy gigs of harddrive space.
Here's a little python script that removes many of these files recursively.
Pipe the python script to a text file to keep track of which files are deleted.
Adapt the file extensions as required.
* Code formatted by http://codeformatter.blogspot.de/
Here's a little python script that removes many of these files recursively.
import os, re
ext_list = ["obj", "idb", "manifest", "pdb", "ncb", "suo", "pch", "pchi", "sdf", "embed.manifest", "intermediate.manifest", "embed.manifest.res", "res", "dep"]
total_size_bytes = 0
for dirname, dirnames, filenames in os.walk('.'):
for filename in filenames:
for ext in ext_list:
expr = "^[a-zA-Z0-9\s]+." + ext + "$"
matcher = re.compile(expr)
if matcher.match(filename):
statinfo = os.stat(os.path.join(dirname, filename))
total_size_bytes += statinfo.st_size
print "Deleting: " + os.path.join(dirname, filename) + " " + str(statinfo.st_size) + " Bytes"
os.remove(os.path.join(dirname, filename))
print "Total: " + str(total_size_bytes/1024) + " KB (" + str(total_size_bytes) + " Bytes)"
print "Total: " + str(total_size_bytes/1024/1024) + " MB (" + str(total_size_bytes/1024/1024/1024) + " GB)"
Pipe the python script to a text file to keep track of which files are deleted.
cleanup.py > cleanup.txt
Adapt the file extensions as required.
* Code formatted by http://codeformatter.blogspot.de/
Wednesday, March 14, 2012
The Visual Studio 2011 Developer Preview
Today I thought I'd give the new VS 2011 Developer Preview a bash. My main interest was to see how C++ AMP can be used in increasing code performance.
This time the migration of projects to the latest VS version was relatively painless in comparison with the upgrade to VS2010. The one error I ran into was
Mode: Total average Per frame Improvement %
0 872.10 ms 0.86 ms
1 859.45 ms 0.75ms 13.42%
2 816.97ms 0.56ms 35.26%
3 879.01ms 0.82ms 5.04%
5 N/A
Comparing these results to the ones obtained using VS2010 as posted in Improving live multimedia pipeline performance
Mode: Total average Per frame Improvement %
0 1224.46ms 1.16ms
1 1105.63ms 1.02ms 12.26%
2 969.82ms 0.55ms 53.10%
3 1572.18ms 1.24ms -6.74%
5 1106.09ms 0.59ms 49.13%
The results were obtained using the FrameGrabber application, running the application 5 times and taking the average. Looks like the compiler team has done some serious work optimising the generated code. Even though the relative placement between the timings of the various modes is still similar, the gap has closed considerably. This is not to say, that optimisation is any less important when using newer compilers : a 35.26% improvement is nothing to frown upon.
Looks like the free lunch isn't quite over yet, as long as you can afford a new compiler/IDE :-)
UPDATE:
Looks like this might have something to do with the auto-vectorizer in VS2011: http://channel9.msdn.com/Shows/C9-GoingNative/GoingNative-7-VC11-Auto-Vectorizer-C-NOW-LangNEXT
This time the migration of projects to the latest VS version was relatively painless in comparison with the upgrade to VS2010. The one error I ran into was
Cannot open include file: 'sal.h': No such file or directory
which was easily fixed by adding "C:\Program Files (x86)\Windows Kits\8.0\Include\shared" to the list of include directories.
Remembering how the performance of an H.263 codec improved *notably* when we migrated from VS2008 to 2010, I was curious to find out what the VC team has done in 2011. After having rebuilt the Video Processing Project solution and running the FrameGrabber application the following results were observed:
Mode: Total average Per frame Improvement %
0 872.10 ms 0.86 ms
1 859.45 ms 0.75ms 13.42%
2 816.97ms 0.56ms 35.26%
3 879.01ms 0.82ms 5.04%
5 N/A
Comparing these results to the ones obtained using VS2010 as posted in Improving live multimedia pipeline performance
Mode: Total average Per frame Improvement %
0 1224.46ms 1.16ms
1 1105.63ms 1.02ms 12.26%
2 969.82ms 0.55ms 53.10%
3 1572.18ms 1.24ms -6.74%
5 1106.09ms 0.59ms 49.13%
The results were obtained using the FrameGrabber application, running the application 5 times and taking the average. Looks like the compiler team has done some serious work optimising the generated code. Even though the relative placement between the timings of the various modes is still similar, the gap has closed considerably. This is not to say, that optimisation is any less important when using newer compilers : a 35.26% improvement is nothing to frown upon.
Looks like the free lunch isn't quite over yet, as long as you can afford a new compiler/IDE :-)
UPDATE:
Looks like this might have something to do with the auto-vectorizer in VS2011: http://channel9.msdn.com/Shows/C9-GoingNative/GoingNative-7-VC11-Auto-Vectorizer-C-NOW-LangNEXT
Subscribe to:
Posts (Atom)